How to Transfer Photos from iPhone to PC in 7 Ways? [Comprehensive Guide]
Nowadays, it has become a common phenomenon that Apple iPhone is always in your hand or your pocket. As you know, iPhone offers fantastic features, with its magic camera constantly optimized. Although almost every new model comes out with a larger phone memory, it is still hard to accommodate more and more iOS photos. So, it's a good idea to transfer photos from iPhone to PC to free up its storage and secure image separately.
Do you know how to transfer photos from iPhone to PC Windows 10/11/7 quickly? OK, the following will deliver a quick and direct answer to you.
- Way 1: How to Transfer Photos from iPhone to PC with a Professional Tool
- Way 2: How to Import Photos from iPhone to PC via Windows/File Explorer
- Way 3: How to Download Photos from iPhone to PC Using AutoPlay
- Way 4: How to Transfer iPhone Photos to PC via Photos App (Windows 10/8)
- Way 5: How to Transfer iPhone Photos to PC Using iCloud.com
- Way 6: How to Copy Photos from iPhone to PC with iTunes
- Way 7: How to Download iPhone Photos to PC with iCloud Photos
Way 1: How to Transfer Photos from iPhone to PC with a Professional Tool
Concerning transferring photos from iPhone to PC, most folks would like to make it expediently through a dedicated program. And tools like MobiKin Assistant for iOS (Win and Mac) can take that convenience to the extreme. This clever player gives Apple operators a full preview of iOS photos after it categorizes them on a computer. Judging from the indicators of the pics on its screen, one could pick desired images for migration or management.
More practical features of Assistant for iOS:
- Transfer photos from iPhone to PC Windows 11/10/8/7/XP/Vista and Mac.
- Migrate data between iDevices and computers/iTunes.
- Apply to such files as photos, music, videos, contacts, messages, notes, bookmarks, books, calendars, etc.
- One-click backup & restore for iPhone/iPad/iPod touch.
- Best iTunes alternative to manage iOS items on a computer straightway.
- Work well well with a whole range of iOS devices, including iPhone 14/14 Plus/14 Pro (Max), iPhone 13/13 Pro (Max)/13 mini/12/12 Pro (Max)/12 mini, iPhone 11/11 Pro/11 Pro Max, iPhone X/XR/Xs/Xs Max, iPhone 8/8 Plus, iPhone 7/7 Plus, iPhone 6/6S/6 Plus, iPod touch, iPad, etc.
- It won't disclose your privacy.


How to transfer photos from iPhone to PC without iTunes using Assistant for iOS?
Step 1. Attach your iPhone to a computer and run the software after the download and installation. Then the utility will recognize your device as you make it by following the simple on-screen prompt.

Step 2. After the recognition, the program will categorize all iOS files on its left menu, where you're required to pick "Photos" and view all your iOS pictures on the right panel.
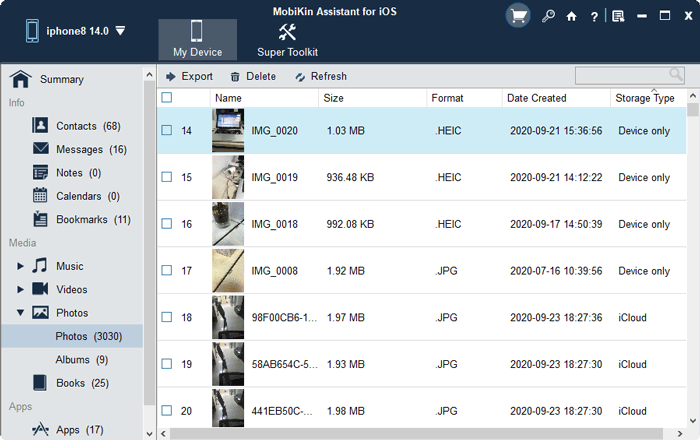
Step 3. Choose your wanted pictures by marking the corresponding checkboxes. Finally, tap "Export" to set an output format and save the items on your computer. That's how to import photos from PC to iPhone with this versatile program.
Video guide:
Read Also:
- iPhone Pictures Not Showing up on PC? Here's the Real Fix!
- 6 Common Methods to Access iCloud from Android Phones/Tablets
Way 2: How to Import Photos from iPhone to PC via Windows/File Explorer
File Explorer, dubbed as Windows Explorer on Windows 7, serves as a media transfer from an iPhone to a PC. To start with, please ensure there is a Lightning-to-USB cable available for connection. In a sense, it is the easiest way to transfer photos from iPhone to PC.
How to access/view iPhone photos on a PC via Windows/File Explorer?
- Link your iPhone to your PC via a USB cord and tap "Trust" to trust your PC as prompted.
- Go to your computer and proceed to "My Computer"/"This PC".
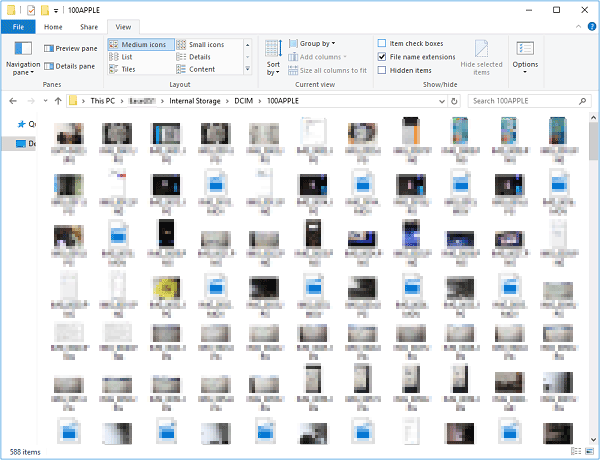
- Locate your iPhone and enter into its "Internal Storage" > "DCIM" > "100APPLE".
- Choose the whole folder, including photos, as prepared.
- Open the folder and pick your desired pictures to put on your PC. (Why can't I transfer photos from iPhone to PC?)
Way 3: How to Download Photos from iPhone to PC Using AutoPlay
Before getting started, follow the drill below to enable AutoPlay on your Windows PC:
- Open "Windows Settings" > "Bluetooth & Devices" > AutoPlay.
- Choose "Use AutoPlay for all media and devices" to turn AutoPlay on.
- Set the default action for AutoPlay when connecting media or devices.
Learn how to upload iPhone photos to a PC via AutoPlay:
- Link your iPhone to your PC via a USB cable.
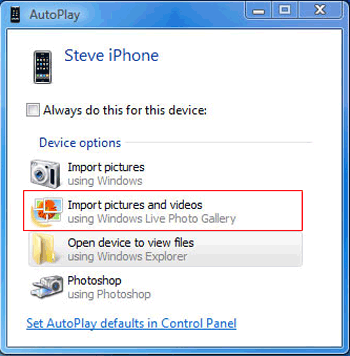
- When your PC detects your iPhone, you'll see the AutoPlay dialogue on the screen.
- Go for "Import pictures and videos" to initiate the iPhone to PC photo transfer.
- Check the imported pics at C:\Users\YOUR USERNAME\Pictures.
More Pages:
- 9 Fixes to iTunes Could Not Back Up iPhone Because an Error Occurred
- Unlock iPhone Free with IMEI Number/Carrier/Unlocking Software
Way 4: How to Transfer iPhone Photos to PC via Photos App (Windows 10/8)
Microsoft blocks Photo Viewer and takes the Photos app as the default viewing tool on Windows 10. Namely, iPhone operators can also use it to edit pics before they back up iPhone photos to PC Windows 10/8. Here's how to upload photos from iPhone to PC:
- Connect your iPhone to a computer via a USB cord.
- Open the Photos app, open your iPhone, and hit "Trust" to trust your computer.
- Tap "Import" from the app in the upper right corner.
- Click "Import from a USB" or "Import from Camera", which allows you to move images from your phone to your PC.
- After that, choose the photos you want to import and hit "Import" > "Continue" or "Import Selected"; finally, specify a location to save them on your PC.

Way 5: How to Transfer iPhone Photos to PC Using iCloud.com
Likewise, iCloud allows you to download your iPhone photos from its webpage to your computer. After enabling iCloud Photos to back up photos to iCloud, you'll have the ability to get photos online. And once done, photos can be tracked from the "Downloads" folder on your Windows PC.
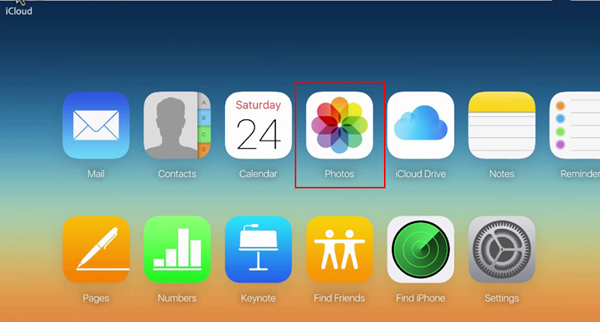
How to get iPhone photos to a PC from iCloud.com?
- Go to your iPhone "Settings" > "Photos" > "iCloud Photos".
- After a while, visit iCloud.com on your computer.
- Sign in to your Apple ID and password by following the prompt on the page.
- If you want to use the same PC to get into iCloud.com the next time, just trust your computer.
- Next, click "Photos" to access your media.
- Pick any photos you intend to download to your computer.
- Press the "Download" sign to export all photos from iPhone to PC.
Way 6: How to Copy Photos from iPhone to PC with iTunes
To transfer photos to your PC from your iPhone, you're required to run iTunes with version 12.5.1 or later. By the way, iTunes may lack professionalism, and it might bring you an unpleasant experience while managing iOS files. Below is how to save photos from iPhone to PC with iTunes:
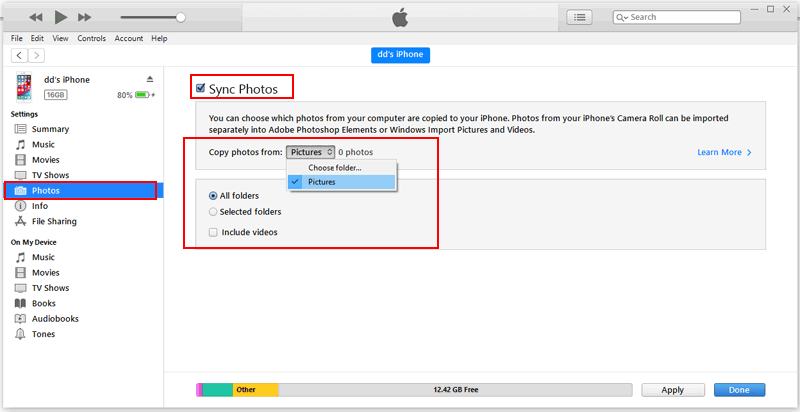
- Plug your iPhone into a PC via USB and run the most recent version of iTunes.
- Press the device image on the iTunes screen when it is recognized. (iTunes could not connect to this iPhone?)
- Tap the "Photos" tab from the left menu of the interface.
- Mark "Sync Photos" and select "Sync Photos from".
- Pick " All folders" or "Selected folders".
- Click "Apply" to transfer iPhone photos to a PC and tap "Done" after that.
Way 7: How to Download iPhone Photos to PC with iCloud Photos
iCloud offers you 5GB of free space after setting up an account on your iPhone. Then you can utilize iCloud Photos to send photos from iPhone to PC by uploading images to iCloud and downloading them to the computer. Here are the instructions for how to transfer photos from iPhone to computer without iTunes via iCloud Photos:
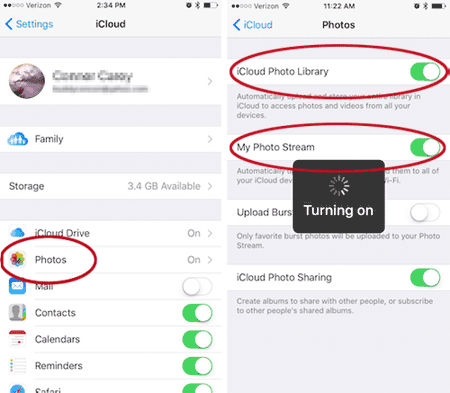
- Go to your iPhone's "Settings" > "iCloud" > "Photos".
- Turn on "iCloud Photo Library" and "My Photo Stream".
- Your pictures will be uploaded to your iCloud account automatically.
- Enter your iCloud account on your PC.
- Choose the photos you want to transfer.
- Tap "Download" in the upper right corner of the PC to save the pictures there.
Final Words
All this being said, ideally, all the solutions above can help you transfer photos from iPhone to PC. But if you want to get a different experience, MobiKin Assistant for iOS is undoubtedly your best bet. In a word, this tool knows you well. For example, it lets you preview the photo files & their properties and select any of them for fast transfer. In addition, it also helps you to back up, restore, and smartly manage various iOS content without iTunes. So, it is obviously the best way to transfer photos from iPhone to PC.
Related Articles:
What If You Forgot Your iPhone/iTunes Backup Password? A Complete Guide Here
How to Fix Restore from iCloud Paused in 12 Reliable Ways? [SOLVED]
Troubleshoot "Unable to Share Photos from iPhone" with 9 Common Tricks
5 Proven Ways to Sync Videos to iPhone 14/13/12/11/X/8/7
How to Transfer Photos from Android to PC Easily? [3 Ways]
7 iPhone Photo Recovery Apps Help Restore Pictures Easily [iOS 15 Supported]
